Thursday, July 29, 2010

Blueberry Cupcakes

Fresh blueberries

I saw this beautiful post of cupcakes by Ming Makes Cupcakes and decided to give Cupcake 19 a try, since we have just plucked about 400-500g of fresh blueberries from a nearby farm. Instead of using her frosting recipe, I used caramel butter cream instead, which I made and froze previously. My friend and hubby who tried the cupcakes likes it, but unfortunately I didn't. The color was a bit too pasty in color, and not dense enough for my liking. So I turned to my favorite baking site, Joy of Baking's Buttermilk Berry Cupcakes. This was more to my taste and the only amendments I made was using Swedish filmjölk and a technique of sprinkling some castor sugar on top of the cupcake for some channelization.

Singlish Swenglish Blue berrycupcake with Caramel Buttercream
From Cupcake 19's recipe

Buttermilk blueberry cupcakes
Buttermilk Blueberry Cupcakes' recipe

Ingredients (Makes 12 regular sized muffins)
2 1/2 cups (325 grams) all-purpose flour
3/4 cup (150 grams) granulated white sugar
2 teaspoons baking powder
1/2 teaspoon baking soda
1/4 teaspoon salt
Zest of one lemon
1 large egg, lightly beaten
3/4 cup (180 ml) Swedish Filmjölk, or Swedish sour milk
2/3 cup (160 ml) rapseed oil
1 teaspoon pure vanilla extract
1 1/2 to 2 cups fresh blueberries

Steps
  1. Preheat oven to 190 degrees C. Position rack in center of oven. Butter or spray with a non stick cooking spray 12 - 2 3/4 x 1 1/2 inch muffin cups. Set aside.
  2. In a large measuring cup or bowl whisk together the egg, filmjölk, oil, and vanilla extract.
  3. In another large bowl combine the flour, sugar, baking powder, baking soda, salt, and orange zest. Gently fold in the berries. With a rubber spatula fold the wet ingredients into the dry ingredients and stir only until the ingredients are combined. Do not over mix the batter or tough muffins will result.
  4. Fill each muffin cup almost full of batter, using two spoons or an ice cream scoop. Sprinkle some castor sugar on top if you wish to, otherwise it's optional.


    Singlish Swenglish Blue berrycupcake with Caramel Buttercream
    Cupcake 19's batter

    Buttermilk blueberry cupcakes before baking
    Buttermilk Blueberry Cupcakes' batter
  5. Place in the oven and bake until a toothpick inserted in the center of a muffin comes out clean, about 20-30 minutes. Transfer to a wire rack and let cool for about 5 minutes before removing from pan. Dust with powdered sugar.
  6. Note: If using frozen berries you may have to bake the muffins a little longer than the stated time. Also, if making jumbo sized muffins, again, you may have to bake the muffins a little longer.

Sunday, July 25, 2010

Love Beef Rolls! (Lövbiff rullar)

When I first came to Sweden and saw this name lövbiff, I thought it was pretty cute and have been pronouncing it as 'love beef' ever since. In actual fact, what it meant is 'leaf beef', because they are thin slices of beef tenderloin, meant to be pan fried with salt and pepper for a couple of minutes on each side only. We've tried the prepared frozen version before and it's a far cry from the real thing.

I wanted to do something different with this and my mother-in-grace had done something similar in a western style, filling it with cheese and bacon in the middle, stewed in a cream sauce. I decided to make a Chinese version of it using green peppers and spring onions. I know if I can find some enoki, it would be something Japanese but alas, that is not so common here. However, the steps to doing this was quite simple - simply sliced up the peppers and spring onions to be equal thickness and length, or just a bit longer than the broadness of the beef slices, put in the greens and roll it up. Pan fry it, add in water and seasonings. Good dish - we both like it :)

lövbiff rullar

När jag först kom till Sverige och såg detta namn 'lövbiff,' jag tyckte att det var ganska söt och har uttalar det som "love beef" i stället. Men de är tunna skivor av oxfilé, som man kan steka med salt och peppar för ett par minuter på varje sida. Jag ville göra något annorlunda och gjörde en kinesisk version av det med grön paprika och salladslök.

Ingredients
2 slices of lövbiff, or thin slices of beef steak
1 spring onion
1/2 or equal amount of green pepper
1.5 tablespoon oyster sauce
1 tablespoon soy sauce
2 teaspoon Shaoxing wine
3-4 slices of ginger

Steps 
  1. Using the blade side of the knife, flatten the piece of beef more if you can, and slice them up to broadness about 1.5 - 2 inches. Slice the spring onion into half length wise and section them into 2 inches length. Do the same with the green pepper, keeping them about the same thickness and length as the spring onions.
  2. Take one piece of spring onion, and one piece of green pepper, lay them on the end of the beef slice and roll it up tightly. Rest it on the pan where you're going to pan fry it, seam down.
  3. Once you have the beef rolls in the pan, place it on the stove and add in some cooking oil enough to cover the base of the pan thinly. The beef rolls should start to sizzle and add in the ginger slices at this point of time. Splash in the wine next.
  4. When you see the beef rolls half cooked, add in enough water to half cover the beef rolls, add in the rest of the seasonings and cook it for a couple of minutes more and you're done!

    Love Beef Rolls

Friday, July 23, 2010

My First Baguettes

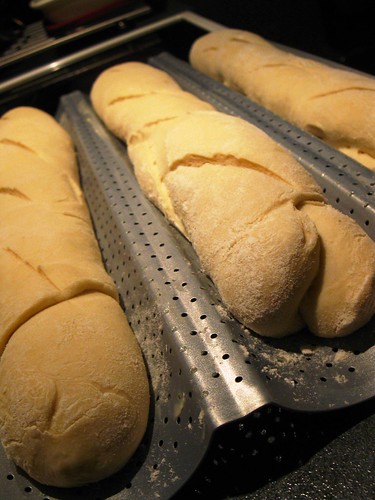
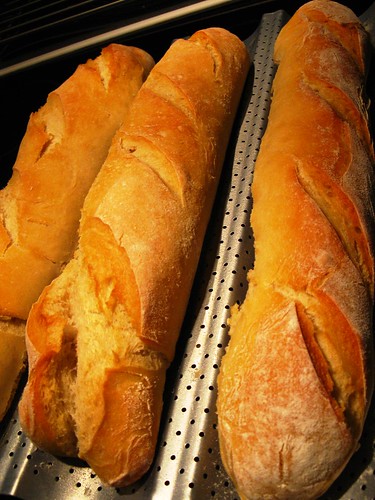
I was looking around for a baguette pan since early this year and finally got a Patisse baguette pan on my recent trip to Göteborg. The shop, which is a wholesale kitchen equipment provider for restaurants is like a mini-heaven to me with nice nifty gadgets that I would like to owned but probably will not. Here's its website and they do web orders too.

I looked around next on the Internet for a recipe and found this one at Not Without Salt's blog. Nice recipe and the original one yields four, so I scaled it down to have just enough for my 3-baguettes-pan, and along with some tips I picked up from a show clip about making baguettes I saw by 曾國城 / Zeng Guo Cheng when he visited Italy I think, when I was back in Singapore last month. It turned up very well and I made french toast and Roti John over the past few days. I also picked up a cup measure and thus, this will make following American measurements a bit simpler ;)

Min Baguette

Jag letade efter en baguette pan sedan början av detta år och äntligen fått ett på min senaste resa till Göteborg. Butiken, ligger på Kust Torget 5-6 och här är sin webbsida och de gör webbeställningar också:

Jag hittade den här recept på Not Without Salt's blogg. Jag skalas ner till just nog för min 3-baguetter-pan, och tillsammans med några tips jag såg från ett tv progam när jag var tillbaka i Singapore förra månaden. Det gick mycket bra och jag gjorde fransk toast och Roti John under de senaste dagarna.

Ingredients( 3 loaves)

5 cup all purpose flour or 550g
Slightly less than 1/2 tablespoon fine salt or slightly less than 1 tablespoon coarse salt
2 teaspoons instant dried yeast
1 and 3/4 cups warm water or 437.50 ml

Steps
  1. One day before baking, mix all the ingredients together until it becomes a dough, but it should not be too sticky. Placed in an oiled bowl, cover and refrigerate it overnight.
  2. On the day of baking, remove it from the fridge two hours before, and divide the dough on a well-floured surface into 3 parts.
  3. Try to flatten each portion into a rectangular shape with your hands or with help of a rolling pin, it doesn't have to be too big.
  4. The next step is to roll the rectangular shape dough tightly like how you will be a Swiss roll, stretching it along the way until it fits the length of the baguette pan.
  5. Cover it with a piece of towel and let if poof for another 1.5 hours or until double in size.
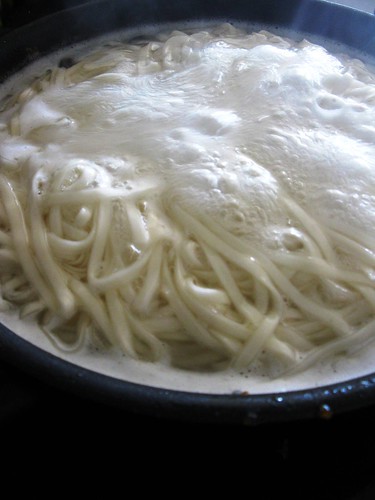
  6. Pre-heat the oven at 230 degrees celsius with the rack and a baking tray under the metal rack for at least 15 minutes. Boil some water meanwhile also as you will be pouring the water into the baking tray to provide the steam required for the crusty exterior of the baguette.


    After poofing before baking

  7. Before putting the bread into the oven, slash each loaf with a sharp knife, being careful not to flatten the loaves. Place the baguette pan into the oven, and add the water to the baking tray below and bake for 20 minutes or until the top turns golden brown. 
  8. Rotate the loaves after 20 minutes to bake the underside till golden brown for about another 15-20 minutes. The internal temperature of the bread (i.e when you stick a thermometer in the middle of the loaf) should be about 93 degrees celsius when it's ready. 
  9. Let it cool before cutting! Don't be like my husband who was quite eager to taste any freshly made bread, but he's cute that way too :). You can toast it the next day for the same crusty feelings.


    my first baguettes!

Wednesday, July 21, 2010

Cold Noodles/ Liang Ban Mian or 凉拌面

As promised, this is the recipe for Liang Ban Mian (凉拌面). As mentioned in the previous post, you can have any toppings that you choose but this was the version that we were treated by Xinba and her boyfriend while we were in Göteborg. Really Good! And these are the list of ingredients you would need:

Condiments for Cold noodles

Ingredients (for one)
2 tablespoons of preserved mustard tubes, chopped
2 teaspoons of Chinese black vinegar
1.5 teaspoons of soy sauce
Sprinkle of salt and chicken stock powder
1 tablespoon of Lao Gan Ma (or chili oil) - varies accordingly to your taste
Dash of sesame seed oil
1 tablespoon suan la mian seasoning (sour & spicy noodles seasoning)
100g of dried noodles  (I used yang chun mian, they look like linguine, only white)

Steps
  1. Place the noodles in a pot of water, bringing it to boil.


    Cooking noodles (yang chun mian)
  2. Once they are done, rinse quickly over cold water before placing it in a serving dish. Arrange all the ingredients over the noodles and finally pour over the toppings of Fried edamame with minced pork. Stir and mix well and enjoy it immediately!


    Chinese Cold Noodles with Edamame and Minced Pork

Monday, July 19, 2010

Fried Edamame/Young Soy Bean/Mou Dou with Minced Meat

Fried Young Soy Beans with minced meat

It's been a while since I've posted but I'm back! Just refreshed from a trip in Göteborg where I spent a couple of days with an old Swedish class friend who will be flying back to China. We were treated to delicious home-cooked meal by her boyfriend (called shifu) and this was something I tried immediately when I got back. I normally eat the frozen edamame by boiling them for a couple of minutes and salting them after drying them like a healthy snack. However, I was informed the Chinese actually call them hairy beans (on account of the small hairs on the pea pods) and fry them like a dish. I really like the crunch of it and the fragrance the jalapeno brings to it. Add it to cold noodles (which I will post up later) makes it a really fulfilling dish!


Det var ett tag sedan jag postat men jag är tillbaka! Jag åkte till en kort resa i Göteborg några dager sedan med en gamla svenska klass kompis som kommer att flyga tillbaka till Kina. Vi var bjöds på utsökt hemlagad mat av sin pojkvän (som kallas Shifu) och detta var något jag försökte direkt när jag kom tillbaka. Jag äter normalt frysta Edamame genom att koka dem ett par minuter och saltning dem efter torkning dem, som ett hälsosamt mellanmål. Men jag var informerade i Kina, man faktiskt kallar dem hårig bönor (på grund av små hår på ärt baljor) och stek dem som en maträtt. Jag gillar verkligen kritan av den och doften av jalapeno leder till det. Lägga till det kalla nudlar (som jag kommer att lägga upp senare) gör det en riktigt uppfyller maträtt!


Ingredients
300g Edamame/ young soy beans/ mou dou, deshelled if you didn't get them as individuals beans already.
150-200g minced pork
1 garlic, minced
1 shallot, minced
2 jalapeno, de-seeded and sliced thinly
dash of pepper and soy sauce
Chicken stock powder to taste


Assembling for fried edamame with minced meat

Steps
  1. Heat up a pan with about 2 tablespoon cooking oil until hot, then tip in the minced garlic and shallot, sweating it till you can smell the fragrance emitting. Add in the jalapeno and stir fry for about 30 seconds.
  2. Next, add the minced meat and stir fry them until cooked. Add in a dash of soy sauce and pepper and mix it thoroughly.
  3. Add in the soy beans and stir fry them, adding in about 3 tablespoon of water, and chicken stock powder to taste. When the soy bean is done (with a slight crunch), serve them hot as a dish, or as a topping for Chinese cold noodles.