Saturday, September 25, 2010

Banh Cuon or Vietnamese Steam Rice Rolls

Singlish Swenglish Banh Cuon or Vietnamese Steam Rice Rolls
Ok, for the second challenge its to tackle a classic dish from another culture - which is something I'm always up to! I love it that even when you try some dishes from some place you think would be familiar to you, like China, you can be surprised even with just marinating or cooking the ingredients in a different order than you are used to.

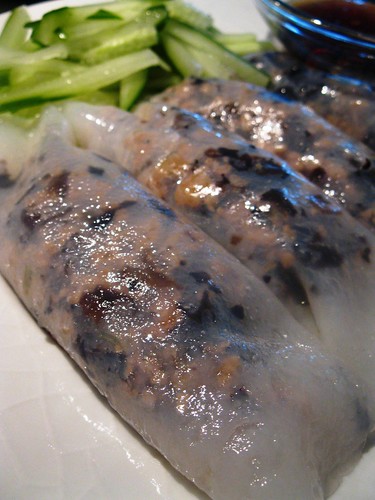
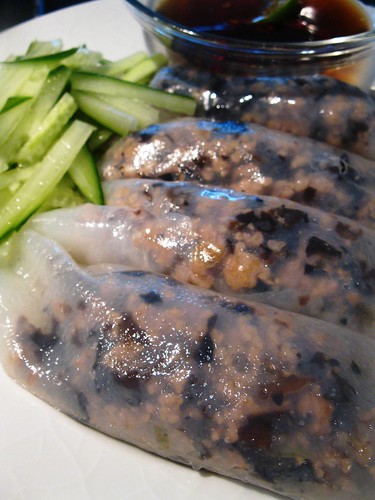
This is quite a classic dish from Vietnam, though I haven't been there personally myself, I do like their beef Pho and generous use of 'green things' in their cuisine. This dish is 'a mistake in disguise' because I actually wanted to make Chee Cheong Fan, which is another form of steam rice sheets but Chinese style, a bit thicker and more floury in taste and eaten with sweet sauce sprinkled with sesame seeds. I saw this mixture at the Asian stores in Malmö and bought them, only to realize it wasn't really the same thing. So, making the best of my mistake is to try making it and with some internet research and combining some ideas from here and there, this is the product of the experiment. The verdict is that its actually quite nice, but it's not as light as it seems and one should probably be happy with 2-3 rolls at most at any one time.

Ingredients
150-200g minced pork
A loose handful of dried black wood's ear (they expand quite a bit after you soak them in water, so be conservative)
Pepper, for seasoning
1 clove of garlic, minced
1 shallot, minced
Fish sauce, a couple of teaspoon for seasoning the filling, and 2.5 tablespoon for the dipping sauce
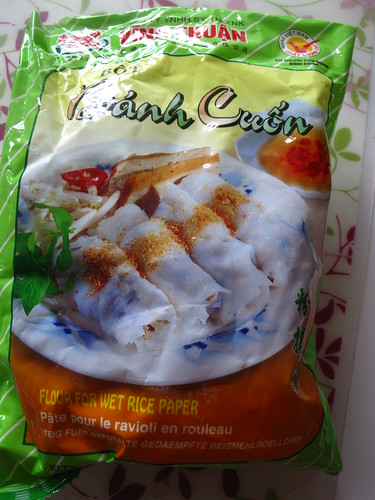
1/3 packet of Banh Cuon mix or you can refer to ravenouscouple's blog for the appropriate batter mix
Water, as according to packet instruction or recipe
2 sliced chili padi
1 lime
sugar to taste

Steps
  1. Mix the batter according to instructions and leave it to rest while you prepare the minced pork filling. It should be a cream-like consistency.
    IMG_7308
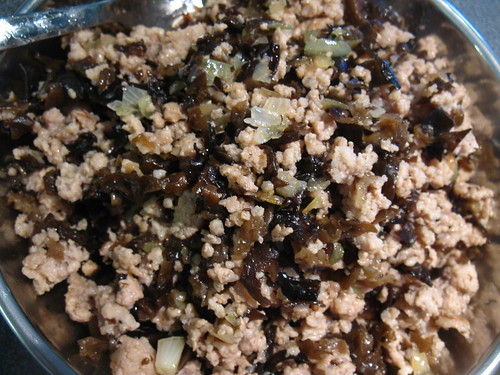
  2. Diced up the wood ears, then heat up about 1 tablespoon of oil in a frying pan over medium heat and add in the minced garlic and shallot first, frying till they are slightly brown before adding in the minced pork. Fry till they are almost cooked through and add in the fish sauce and pepper to taste. When done, dish it up and set aside to cool.

    IMG_7318
  3. Prepare the dipping sauce by mixing 2.5 tablespoon of fish sauce with 3 tablespoons of sugar, 4 tablespoons of lime juice and 150ml of water, together with the sliced chili padi, and if you like a clove of minced garlic. You can adjust the taste of the sauce according to your preference, example if you like it spicier, add more chili. Set aside for the final assembly.
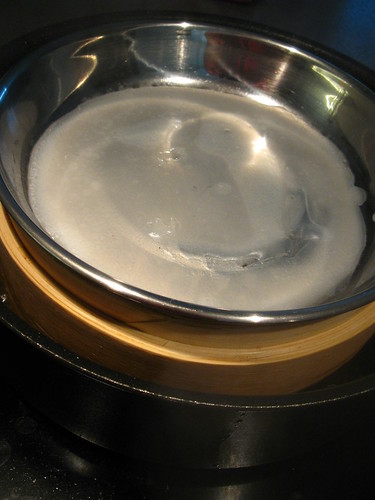
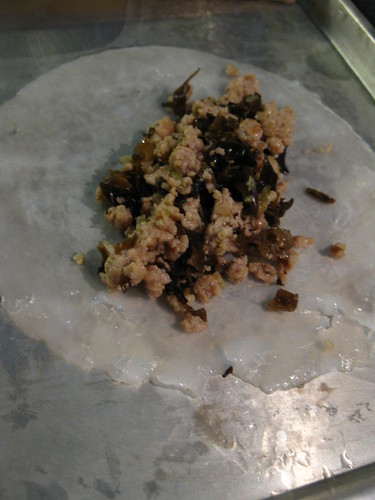
  4. Next, prepare a steamer for the rice sheets. I did a few trials, firstly by using a cheesecloth as portrayed some blogs I saw, and ladling the batter on top to steam, but it was too difficult and they get stuck onto the sheet. In the end I used my trusty 555 metal plate  which I got from Singapore and set it in my bamboo steamer, oiling the plate a little first, (or any steaming equipment you might have) for it to get hot first. Then, pour in 1 ladle of batter (which should be sufficient to cover the base of the plate not too thickly) onto metal plate and cover it, steaming over medium heat for a couple of minutes until it turns translucent and there are no uncooked batter on the sheet. You have to repeat this process until you use up your batter.

    IMG_7320
  5. Using a spoon, tear off the steamed rice sheet off the plate onto an oiled surface and you can add the fillings at this point. The amount is dependent on your preference and I like a hearty roll, as you can tell ;)

    IMG_7321
  6. Sliced up some cucumbers to be served with the rolls and the dipping sauce.

    Singlish Swenglish Banh Cuon or Vietnamese Steam Rice Rolls

Saturday, September 18, 2010

The Muffin Project - Cheese and Ham Muffin (Ost & Skinkmuffins)

Singlish Swenglish Attempts Ham and Cheese Muffins

I finally feel confident enough in my Swedish to buy a Swedish cookbook, and this book is all about muffins. I've decided I want to make all the muffins from this book because it has very unusual muffins recipes like broccoli and onions or asparagus muffins. The idea that muffin is not only a sweet product sits strange with some and I want to try to break that conception. And I think that's what defines my food blog - being able and willing to try new things from different cultures and keeping an open and excited mind on the possibility to know new ways of cooking and taste. O and if you are interested to vote for my entries on Project Food Blog, you can click here :)

And of course the fun thing when having such an experimental project this time round is I get to buy all sorts of new and healthier flour to use according to the recipes in this cookbook by Johan Åkerberg. I'm going to try the muffins as and when I have all the ingredients available and the first one is based on my Johan's two favorite ingredients - ham and cheese. Our verdict of this muffin is that while it is a bit dry, it's quite a healthy and filling muffin to have and one is sufficient to get you through lunch.
Singlish Swenglish Attempts Ham and Cheese Muffins

Jag känner mig äntligen säker i min svenska för att köpa ett svenskt kokbok, och den här boken handlar om muffins. Jag har bestämt mig jag vill göra alla muffins från den här boken eftersom det har mycket ovanlig muffins recept som broccoli och lök och sparris muffins. Tanken att muffin är inte bara en söt produkt är kanske konstigt med vissa och jag vill försöka bryta denna uppfattning. Och det roliga sak är att jag får köpa mer hälsosammare mjöl som man använda enligt recepten i denna kokbok av Johan Åkerberg. Den första är baserad på min Johans två favorit ingredienser - skinka och ost. Våra åsikt av denna muffin är att  det är lite torr men det är en ganska sund och fyllning muffin att ha och en är tillräcklig för att ta dig igenom lunch.

Ingredients (Makes 6-8)
3 dl wholemeal flour (fullkornsvetemjöl)
1 dl rye flour (rågsikt)
2 teaspoons baking powder (bakpulver)
1/2 teaspoon salt
1 teaspoon chili powder (chilipulver)
100g cheese, grated (ost)
100g smoked ham, cut into strips (rökt skinka, strimlad)
2 egg (ägg)
2 1/4 dl milk (mjölk)
3/4 dl rapeseed oil (rapsolja)
Grated cheese for toppings (riven ost)
Singlish Swenglish Attempts Ham and Cheese Muffins

Steps
  1. Preheat the oven to 200°C.
  2. Sieve the flours into a large mixing bowl, together with the baking powder, salt and chili powder.
  3. Add in the grated cheese and ham into the mixture.
  4. In another bowl, mix the eggs, milk and oil together until well combined.
  5. Add the egg mixture to the flour mixture and combine thoroughly.
  6. Line the muffin pan with muffin cups, and add fill each to about 3/4 of the way, and top it up with some grated cheese.


    Singlish Swenglish Attempts Ham and Cheese Muffins
  7. Bake for about 20-30 minutes. 
Singlish Swenglish Attempts Ham and Cheese Muffins

Sunday, September 12, 2010

Simple Curry Puffs

Simple Curry Puffs

When I was going to primary school, I used to pass by these housing estate on my way to school. There is always this young Malay boy/girl carrying a basket selling these curry puffs. What was different was that they will also squirt into the bag of curry puff, a sweet, spicy, watery chili sauce that the curry puffs soaks up, and while turning some parts of it soggy, the crust still provides that crunch and I really missed that experience! I have been trying to find the recipe for that sweet chili sauce but have had no luck, so if you know what I'm talking about, drop me a comment!

Till then, this was what I think satisfy that longing while I'm here in Sweden. This is different from the spiral curry puffs I did before because while you make the filling the same way, the skin is only made out of one type of dough. After trying a few, I think this recipe from My Kitchen achieves what I was looking for.

Ingredients:
250g flour
50g rice flour
50g tapioca or corn flour
50g butter
50g vegetable oil
130ml icy cold water
pinch of salt

Filling - you can follow as from my previous recipe or for a vegetarian version, just fry the diced potatoes with peas and onions until cooked, add curry powder, salt and water and simmer till done. Be sure it should be quite dry so it does not soak through the curry puff's skin.

 Steps
  1. Mix the flour and salt together in a bowl while you heat the butter and oil in a small pan.
  2. Pour the oil into the flour mixture, mixing well with a pair of chopsticks or wooden spatula, then add the cold water until a nice firm dough is formed. Wrap in plastic film and rest for at least 15 minutes before use.
  3. Roll out the dough into a long sausage and divide it into 24 portions. Flatten each portion with your palm before rolling out to a circle about 0.5cm thick. 
  4. Place about 1.5 teaspoon of filling in the middle of the dough, then seal it by folding it into half. Using your fingers, turn the edge inwards continuously to form those characteristic crusty edges of curry puffs.

    Simple Curry Puffs
  5. Heat up a pot with enough oil to deep fry the curry puffs over medium heat, until each turns a satisfying golden brown. If you plan to freeze the uncooked ones, be sure to freeze them individually so they don't stick together and makes it easy to take out the portion you need at any point of time.

    Simple Curry Puffs

    Simple Curry Puffs

Thursday, September 9, 2010

Kärleksmums or Swedish Love Yummies

I've blogged about this in my old blog but it's one of those dessert I make now and then since they store really well and I like the hint of coffee in them. They don't photograph very well for me but it's really quite good! It's not the same like the coconut-chocolatey balls you can buy from Ikea but it is more cake-like.

This recipe is taken from one of those Swedish sites I check out regularly for inspiration for Swedish food or otherwise. You can google 'kärleksmums' and probably find a few variations of the recipe but this one from Anne's works well for me :)

Swedish Love Yummies

Ingredients
2 eggs
240g sugar
150 ml milk
225g flour
2 teaspoons baking powder
2 teaspoons vanilla sugar or extract
1 tablespoon cacao powder
150 g melted butter

For the frosting
150g sieved powdered sugar
4 tablespoons melted butter
4 tablespoons cold strong coffee
1 tablespoons cacao powder
2 teaspoons vanilla sugar or extract
dessicated coconut flakes

Steps
  1. Butter and line the pan with baking paper while preheating the oven at 225 °C.
  2. Beat the eggs and sugar until light and fluffy, then add in the rest of the ingredients one by one, making sure to blend well and make sure there are no lumps, ending with the addition of melted butter. Pour it into the pan and bake for about 15 minutes. Test it with a skewer to make sure its done and let it cool while you prepare the frosting.


    Swedish Love Yummies
  3. For the frosting, just mix everything together except for the coconut flakes which you sprinkle after you pour the frosting over the cooled cake. Serve warm or cold, it's equally good!


    Swedish Love Yummies

Monday, September 6, 2010

Big Plate Chicken 大盘鸡

Big Plate Chicken
I learnt about the existence of this dish from my friend when she cooked it for our gathering one time and I like it ever since. It's different from our normal oyster chicken with potatoes because it has that zing to it with the addition of szechuan chili and peppercorns. I heard that this dish normally goes with noodles at the bottom of the dish and hence you need a big plate to contain it. However it works just as well as a dish to go with rice.

Ingredients
3 chicken breasts or 1 whole chicken, cut into large chunks
3-4 potatoes, peeled and cubed
1 onion, quartered
1 clove of garlic
2 cm of ginger, peeled and minced
6 dried szechuan chili, cut into halves if you like it spicier
1 teaspoon szechuan peppercorn
1 star anise
2-3 green chili pepper, or bell pepper, cut into chunks of equal size like the potatoes
2-3 tomatoes, quartered (optional)
salt
pepper
soy sauce
sesame seed oil
sugar
enough water to cover the chicken and potatoes
2 tablespoon Shaoxing wine

Steps
  1. Marinate the chicken in 1 tablespoon soy sauce, 1 tablespoon Shaoxing wine and a dash of pepper and a teaspoon of sugar for about 10-15 minutes.
  2. Heat up about 4 tablespoon of cooking oil over medium heat and add in the szechuan peppercorns to fry for about 30 seconds to season the oil. You shall smell the fragrance of the peppercorns and remove them when done.


    IMG_6785
  3. Add in the chicken to brown for a while and then add in the ginger, garlic, chili and onions and mix well.
  4. Pour in the water and about 4 tablespoons of soy sauce or to taste, the star anise and simmer the chicken for about 3-5 minutes before adding the potatoes.


    IMG_6788
  5. Turn down the heat and cover to simmer for about 10 minutes or until the potatoes are about done. Add in the green chili peppers (and tomatoes if using) and simmer for another 5 minutes. You can adjust the taste with salt, pepper and Shaoxing wine according to your preference at this point.


    IMG_6791
  6. Just before serving, sprinkle some sesame seed oil, stir and serve.

IMG_6792

Friday, September 3, 2010

100th Post - Lemon Peach Mousse Cake with Marshmallow Fondant Flowers

It's my 100th post today! And also the end of my first week in my new position! I don't know if I will be able to update my blog as regularly but I thought what better way to celebrate than to post about a really pretty cake I made for a friend's birthday recently. I was quite proud of it as I'm not a cake decorator and it was my first time making the marshmallow fondant paste. I was hesitant to try it but after I did, it didn't turn out so hard after all! After making this cake I now wish I have a decorating pedestal (those you can spin round) and more fondant moulds and food colorings!

I took lotsa of pictures of it so this will be a long post laden with illustrations and here's the first one:

Singlish Swenglish Lemon Peach Mousse Cake with Fondant Flowers

It received raving feedbacks from my nice friends but you should try it for yourself to really know :)

Ingredients for Marshmallow Fondants (from About. com, they provide very detailed steps to make it. I've reduced the recipe by halved and still have enough paste left over to cover another 23 cm cake with flowers)
2 cups of mini marshmallows (not packed tightly)
2 cups powdered sugar, plus extra for dusting
1 tablespoon water
Food coloring, red and green or your choice
Fondant flower stamp, I got mine in Singapore from Phoon Huat
  Steps
  1.  Place the marshmallows and water in a deep bowl and microwave on high for about 1 minute. During the process they will expand till they look almost they are going to flow out of the bowl (if its too small) but they shrink back almost immediately when you take them out to look like this:


    Melted Marshmallows
  2. Use a rubber spatula to stir until they are smooth and all the marshmallows is smooth and free from lumps. If there are some marshmallows not completely melted, microwave it again for 30 seconds and stir again. If you plan to make them with just one color you can add the food coloring now or later if you plan to have more colors.
  3. Add the powdered sugar gradually and mix into the marshmallows until you cannot mix in anymore. I probably used about 1 3/4 cup of sugar and that was enough.
  4. Use the remaining sugar to dust your work surface generously and scrap out the mixture and begin kneading with your powdered hands like how you will work a normal dough until it becomes smooth like this, your first marshmallows fondant:

    Marshmallow fondant dough
  5. Divide up the dough according to the colored portion you intend to have, for me I divided into three parts, and colored two of them with red and green respectively. For this stage of coloring, put on some latex gloves first to avoid staining your hands. Add the coloring by drops and knead it in evenly (this may take some time as you stretch and blend the dough for the color to be even).
  6. Once your colored fondant is ready, rolled them out into thin sheets according to your mould's instructions and cut the flower shapes out.

    Fondant Cut mould
  7. Place the cut-out fondants in an egg carton to help form its shape and leave it overnight to harden. Marshmallows fondants are a bit flexible and will not harden until its brittle.

    First petal layers

  8.  I use water to stick the layers together so you can try doing that too or accordingly to your creativity and mould. Let it dry and harden in time before use!


    Marshmallow flowers 
    Lemon Peach Mousse Cake(from Alex Goh's Baking Codes)
    Ingredients
    - Sponge cake as per my previous recipe from here. However, after cooling, instead of slicing into two layers, slice it equally into three layers. I find the wire sawing gadget Johan bought for me from Ikea to work very well for such needs and it's not expensive and comes with some pipping bags and tips too:
    Slicing up the sponge cake in three layers
    - 50g lemon juice
    - 70g sugar
    - 1 egg yolk
    - 1.5 tablespoon gelatin powder
    - 70g water
    - 250g whipped fresh cream
    - half of a can of peaches, diced, the other half sliced thinly
    - 150g whipped fresh cream for topping/covering the cake

    Steps
    1. Cook the lemon juice and sugar in a small pot until it boils and pour it into the bowl containing the egg yolk, mixing it until well blended. Return to the pot to continue cooking for a while.
    2. Premix the gelatin powder and water and melt it in a bowl over the pot of lemon mixture. Add it to the lemon mixture and mix until well-combined.
    3. Let it cool to about 30 degrees celsius over cool water. If you do not have a suitable thermometer, do like what I do, test it with your finger. If it is cool enough to touch, you can add in the whipped cream and diced peaches. Mix well until evenly blended.
    4. Now you are ready to assemble your cake. Using the same cake form (preferable with a removable bottom) you use to make the sponge cake, place the bottom later on the mould first:

      Sponge Cake layer by Singlish Swenglish
    5. Pour half the lemon mousse mixture over the cake and placed half the sliced peaches on top.
      Lemon Peach Mousse Layer by Singlish Swenglish
    6.  Top with the second layer of cake and pour the remaining mousse on top, along with the rest of the peach slices.

      Sponge Cake layer by Singlish Swenglish
    7. Lastly, top with the top layer of the cake and keep it refrigerated (I kept it overnight) until set. Which then looks like this:
      Lemon Peach Mousse Layer by Singlish Swenglish
    8. If the mousse layer extends out too much from the cake circumference, you can do some tidying up by slicing the excess off (and tasting it of course, Johan's the man for this job). This is so it looks neat when you slather on the rest of the whipped cream later:

      Lemon Peach Mousse Layer by Singlish Swenglish
    9. And this is the cake covered in snowy white cream:
      Lemon Peach Mousse Cake slathered in cream
    10. And so the last part is the fun part - decorating! This I wouldn't suggest how you can do it because everyone has their own style but this is just a 'few' picture of my first very pretty cum tasty cake:

      IMMarshmallows Fondant Flowers on Lemon Peach Mousse Cake

      Marshmallows Fondant Flowers on Lemon Peach Mousse Cake

      Lemon Peach Mousse Cake with Fondant Flowers

      Lemon Peach Mousse Cake with Fondant Flowers

      Last but not least, remember to share the cake! They always taste better when enjoyed in company (and a cup of tea).