This is actually my second time making kaya, well..reason being I was back in Singapore and didn't need to make it. It was available everywhere!I explained this to Johan as a custard of some sort, only it is made with coconut milk and we use it as a jam.
Since I am now back in Sweden and with autumn coming, kaya toast (with my own homemade bread) sounds even more tempting than ever so I did some research and came out with this proven recipe for kaya. Especially for those of you who like to control how sweet your kaya is, this is quite simple and easy to do :), this yields about 100-150ml of kaya which you should keep in the fridge.
Since I am now back in Sweden and with autumn coming, kaya toast (with my own homemade bread) sounds even more tempting than ever so I did some research and came out with this proven recipe for kaya. Especially for those of you who like to control how sweet your kaya is, this is quite simple and easy to do :), this yields about 100-150ml of kaya which you should keep in the fridge.
Preparation Time
Around 30-45 minutes
Equipment Required
Deep pot for boiling water
Bowl for placing over pot of boiling water
Sieve
Whisk
Ingredients
3 large eggs (or 4 small eggs)
Around 30-45 minutes
Equipment Required
Deep pot for boiling water
Bowl for placing over pot of boiling water
Sieve
Whisk
Ingredients
3 large eggs (or 4 small eggs)
200ml of thick coconut milk (you can get those tinned ones)
100g sugar (you can lessen this if you like)
1-2 tablespoons of brown sugar and a little water
Steps Getting the ingredients ready
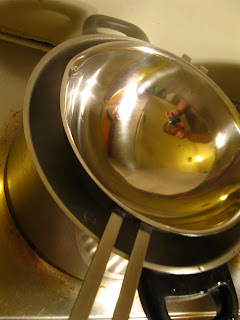 And of course not forgetting the equipment, which you need to double boil it or cook it over a pot of water. We got this bowl thing from IKEA which we can just stick it over a pot of boiling water, it can be use to melt chocolate too :)
 First, whip the eggs, then add in the sugar, whip till they dissolve and then add in the coconut milk.


1-2 tablespoons of brown sugar and a little water
Steps
Getting the ingredients readyAnd of course not forgetting the equipment, which you need to double boil it or cook it over a pot of water. We got this bowl thing from IKEA which we can just stick it over a pot of boiling water, it can be use to melt chocolate too :)First, whip the eggs, then add in the sugar, whip till they dissolve and then add in the coconut milk.Meanwhile, you can also start to caramelize the brown sugar. They help to add colour, but I rather like the Yeo's canned kaya bright orange, maybe next time I will try with the orange/red sugar...which I can only get when I visit Singapore again I guess. Keep an eye on the caramelizing!
Ok...back to our egg/coconut milk/sugar mixture, sieve it onto the bowl over the pot of boiling water. This is so to reduce the air bubbles etc.
Take a whisky and get ready to stir it frequently and scrap down the sides! Some recipes called for 1 hour of constant stirring, but mine started to thicken after around ten minutes. Remember not to fill up the pot with water that touches the bottom of the bowl, you should be using the 'steam' as the heat source, but of course you can top up with hot water when the water level goes down.
This is how it should be looking when it thickens. Kind of like how you want your consistency of your jam to be. Remember it will be even thicker once it cools down so don't cooked it till its too hard to stir.

Then you can add in the caramelized brown sugar, you can control how dark you want the colour to be. This looks quite authentic right?
 And this was my kaya toast with butter this morning :)
No comments:
Post a Comment